Capacitive Discharge Ignition
(cheap and dirty)
Warning!!
High voltage discharges can be deadly. Proceed at your own risk.I needed a 'quick to build', cheap ignition system for testing rockets. This is how I built one.
1. Remove the guts from a flash type throw away camera.
2. Cut about 18" off the female end of a cheap 9' long 115v extension cord.
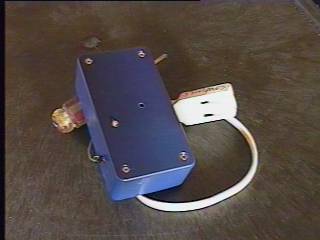
3. Put a hole in the side of a small 'project' type box, large enough that the wire of the extension cord can fit through the hole. You can get a box at Radio Shack or use whatever package you see fit. With the receptacle on the outside of the box, push the cord through the side of the box and leave 3-4" inches on the inside of the box. Put some cable ties around the wire, near the hole, or glue the wire in the hole to prevent damage, in case the wire gets pulled on.
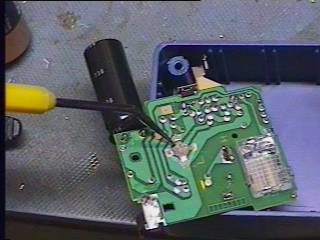
4. Find the button that causes the flash unit to charge and drill a hole in the lid of the box that will allow the switch to be pressed from outside the box. With the flash unit mounted in the top of the box the button is about 1/4" below the surface of the outside of the lid. A pencil or pen can be used to press the button through the hole. See photo, the button is the little cross looking thing.
5. Solder the extension cord wires right onto the wires coming out of the large filter capacitor. It is the big cylinder and will most likely be marked 330v 160uF. Put one wire on each lead of the capacitor. It does not matter which wire goes where.
6. If you want to see the little 'ready light' you will need to make a hole in the lid for it too. On the unit I used, the light was on the wrong side of the board. Using the solder gun to melt the solder, I pulled the little light out and re-soldered it back in on the side of the board where the charge switch was. With both holes in the lid, I hot glued the board to the lid of the box.
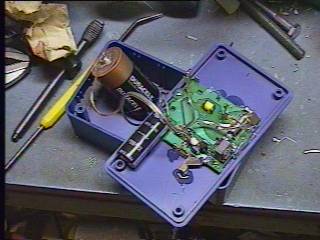
7. These units use one AA battery but my box was big enough to handle a C size (9 volts will fry it, DON'T even think about it). With a file I roughed up the ends of the battery and then soldered the some wires from each end of the battery to the old battery holders on the board. CAUTION!! When soldering to a battery you should do it very quickly and avoid getting the battery hot. One thing that helps is to tin the wire with a little solder first. Also, tin a small spot on the battery, where each wire goes. After the battery has cooled back off, hold the tinned wire over the tinned spot on the battery and lay the soldering gun on it. As soon as the solder melts, you can remove the soldering gun. This avoids damaging the battery. If a battery gets too hot it could leak, maybe on you. The unit will NOT work if you connect the battery backwards. It is hard to tell which way it is suppose to go. I had to try it both ways to figure out which was right. It did not hurt the unit when I connected it backwards.
8. Put the lid on. You should make sure the battery does not bang around and damage the board. I used some foam to block the battery in one end of the box.
CAUTION!!! Without a switch to disconnect the battery, the high voltage is likely to be on the capacitor anytime, or all the time. On my unit, as soon as the unit fires it recharges by itself. Be aware that just because the little light is off that it is NOT safe. The light is only on when it is at it's peak voltage. It is still dangerous even after settings for hours, maybe even days. It should always be handled as if it were fully charged.
9. Next, I took the male end of the extension cord and shortened one wire. This helps avoid short circuits from the two wires getting together. Then I connected it to my homemade igniter. What I have found that works the best is to use a 1/8 watt, 2.7k ohm resistor as a load/heater. I make some leads out of phone wire and solder the resistor across the ends of the phone wire. I give the resistor 2 or 3 dips in a thick slurry of BP and NC lacquer. Note: I have went back into my unit and added a second capacitor (in parallel, and added a 10 watt 10 ohm resistor in series with one wire of the output plug. This resistor has helped to stop the resistors from just popping and not setting the coating on fire. The second capacitor has given the unit more power to heat the resistor and improved reliability.
10. Now for one of the great parts of this idea, your shooting wire that you stretch from the launch site can be several 100 foot extension cords that you might already have in your garage. Be sure to short the end of any wire that you plan to connect to an electric igniter. This makes sure it is not plugged in to the box and also discharges any static charge that might be in the wire. This is a big safety issue and should always be done.

11. Now to fire it, I connect all my extension cords together and the male end of my cut up cord. I also, connected igniter. Next I put the igniter in the engine. You may want to put the igniter in the engine first. There are arguments both ways, on which is safer. Now that I am at a safe distance I pull the last shorting wire from the male end of my extension cord. I do a final check to make sure everyone is ready, countdown, and plug the extension cord into the female wire coming out of the CD box. The igniter should fire in an instant. UNPLUG IT!!!! It will be recharging even while you have it connected, unplug it and put the shorting wire back on the extension cord, BEFORE you try to connect up for a following launch. I have also used this box to fire display mortars. By putting a cheap power strip between the CD unit and my extension cord, I have a switch to fire it with, too.