Nozzle-less Black Powder Rockets
(Rockets Made Easy)
Tools for making
tooling:
Wood saw
Hacksaw
Electric drill
3/4” drill bit (base block drilling)
3/16” long drill bit (rammer drilling)
2 course sanding blocks (60 or 100 grit)
Fine sandpaper (320 or 400 grit)
Material for tooling:
5/32” (or 3/16”) x 6” brass rod
3/4” x 18” hardwood dowel rod
1” hardwood board (2- 2”x2” blocks)
Wood glue
PVC pipe for sleeve
Hose clamps for PVC pipe
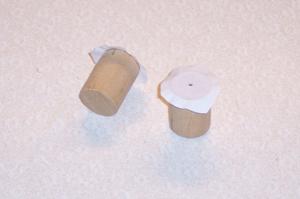
Rammers:
You need to make a rammer with a center hole and a rammer with no hole. Cut a length of the 3/4” dowel rod to be about 2” longer than your motor tube. To drill that hole, get about 10, 3/4” fender washers, stack them on a drill bit, and tape around the outside with vinyl tape to make a drill guide.
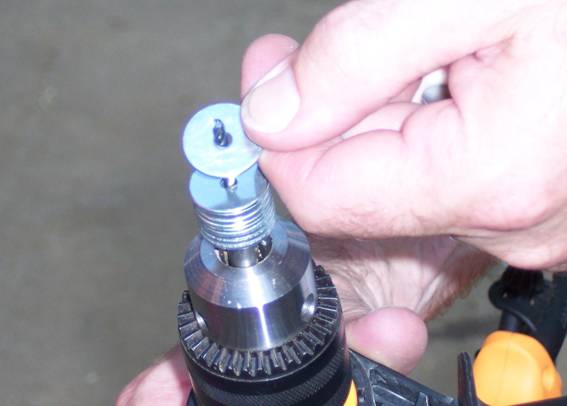
Slip the stack of washers inside the end of a rocket tube. Slide your rammer into the other end of the tube, so it will butt up to the washers. Insert a pilot drill through the washers and drill a center hole into the end of the rammer.
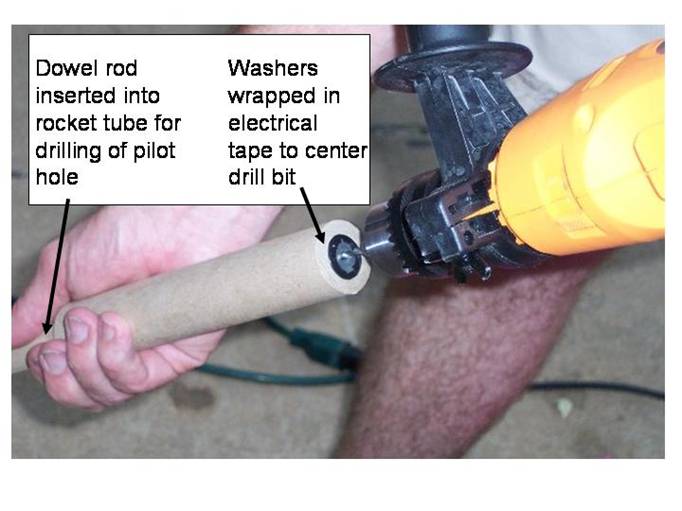
Remove the rammer and finish drilling it with a long bit to allow the entire spindle to go up into the rammer.
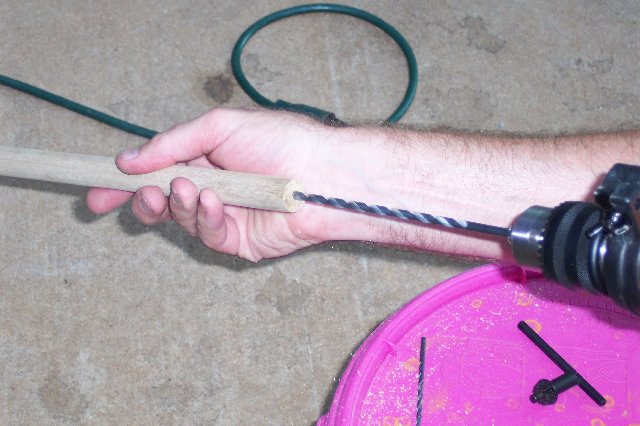
It is helpful to drill a tiny bit, pull the bit out, and rotate the dowel about a quarter turn, and drill a tiny bit more. This action will help you to drill straighter (hopefully).
Cut the solid rammer to be about 2-1/2” to 3” long, assuming a 7-1/2” motor tube. The shorter the solid rammer is, the easier it is to keep it lined up while ramming. When the motor tube is almost full, a very short rammer may also be a helpful addition, but it is not required.
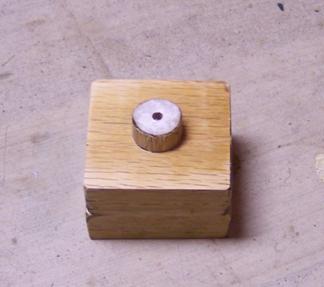
Base:
Mark the hardwood board for the cutting of 2, 2”x2” blocks. Before you cut them out, mark and drill a 3/4” hole in the center of one of the block layout. A pilot hole will help keep the drill from “walking”. After drilling the hole in the one block, cut both blocks from the wood.
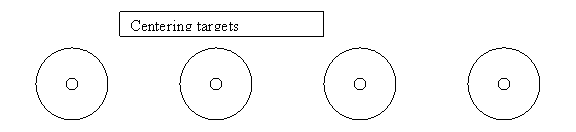
You can make the base nipple by cutting off a length of the 3/4” dowel rod that is the block thickness plus about 3/8”. Make sure you can get the dowel piece to press into the bored hold of the 2”x2” block. Check the fit and sand it down or ream the hole out before continuing. You need to drill the center of the nipple to accept the spindle rod. You can cut out a centering target and glue it to the end of the dowel rod piece. Take an ice pick, punch, or a nail and punch through the center of the target to mark the center of the dowel rod. Or, you can use the pilot drilling method before you cut the piece from the dowel rod. You can drill it first and then cut it off. If you don’t get the hole centered very well, try again. The grain of the wood will make the drill follow its own path. A different piece of wood, maybe from the other end of your dowel, might help.
File a chamfer on the ends of the base nipple to allow the rocket tube to be started over the nipple easier and to also fit in the base with less effort.
Using wood glue, glue the two blocks together and glue the base nipple into the block that has the bored hole in it. Use clamps or vinyl tape (electrical tape) to hold it all together until the glue sets. Make sure the blocks have no burs on them that will prevent them from being glued together nicely. If burs exist, sand them off before gluing. It should look like this when finished.
Spindle:
The spindle will come out of the motor with less effort if it has a little taper on it. Before working on the taper, file or sand each end of the brass rod, to remove burs and sharp corners. Chuck the brass rod into your drill with approximately 1-1/4” of the rod, up in the drill chuck. Have someone help you by holding the drill on the edge of a bench, with the drill running, while you work the sanding blocks against the rotating rod. Work both blocks against the rod, like you would your hands if you were rolling a pencil between your palms.
Do more work near the tip of the rod and less work on drill mounted end of the rod, to create the taper. The amount of taper is not critical and you can always repeat this process to add more taper, if desired. So, don’t get hung up on the details, just sand on it a while and it should be better than nothing. Before you stop, use the fine sand paper to smooth the rod. Try to get it pretty smooth, but it is not critical. Final finish can be made with steel wool, if desired.
The large end of the spindle (that has been in the drill) will go into the base nipple hole. It does not need to be tight. You do need to be able to insert it in all the way without the need to drive it like a nail or something. You will need to lift it out after you ram the rocket.
Sleeve:
Find schedule 40 PVC pipe that has an internal diameter slightly larger than the outside of your rocket tube. Cut, with a hacksaw, a length about 1/2” longer than your rocket tube. Mark a straight line down the length of the tube and saw down the line, to split the tube open. Your saw path will close up tightly after you remove your saw. This is normal. Insert your rocket tube into the sleeve. Force the tube to one side of the tube, leaving all of the gap on one side. Observe the size of the gap. You will need to saw down the length of the tube and remove a slice about 2-1/2 times the width of this gap. So, if the gap is 1/8”, slice out 5/16” from the side of the pipe. Clean the pipe up with a file to remove the rough edges. Arrange a series of hose clamps over the sleeve to allow you to tighten the sleeve around the rocket tube. For a 7.5” tube, you will need about 8-10 hose clamps. More are better, but take longer to loosen and tighten.
Fuel:
By weight, mix potassium nitrate 75%, charcoal 15%, and sulfur 10%. Make sure all components are very fine powder and free of lumps. Ball milling the powder is best. If you have no ball mill, mix by passing materials through screens several times. Put the mixture into a zipper type plastic bag. Weigh out an additional 2% of paraffin or Vaseline into a clean food can for a binding agent. Melt the binder and then add to it a solvent to thin it out. You will need enough of you binder/solvent mix to wet the powder to the point you can make it stick in a loose ball or wad. This amount takes a little guess work, but for a 500 gram batch, a typical 15 ounce “food can” will be about half full. Mix your binder/solvent together well and dump it into the bag with the powder. Seal the bag and work the mixture until the powder and the liquid are well mixed. You should be able to squeeze the powder into a lump and it hold together inside the bag, like wet sand would. Next, you want to force the wet powder through a screen, to make small granules. I use a $3 gravy strainer from Wal-Mart. It is less work on your wrist to rest the strainer over a large bowl, pan, or can. I use medium size kitchen spoon to work the powder and force it though the screen. Spread the powder out to dry on newspapers. CAUTION, keep in mind that most solvents will create an explosive vapor hazard in addition to the fact that you don’t want to breathe the vapors. So, take precautions. There are some automotive brake cleaners in spray cans that do not use a flammable solvent and the solvent will work with oily binders. This may be something to consider if ventilation of your work area is less than ideal. Allow the fuel to dry until you can no longer smell the solvent, if you stick your nose close to it and sniff.
Fuel example:
375 grams potassium nitrate
75 grams charcoal
50 grams sulfur
10 grams paraffin or Vaseline
7 oz (approx) lacquer thinner
Tools for building rockets:
Heavy block to support spindle base
Spindle base with spindle
Rammers
Powder scoop
Hammer
Sleeve
Material for building rockets:
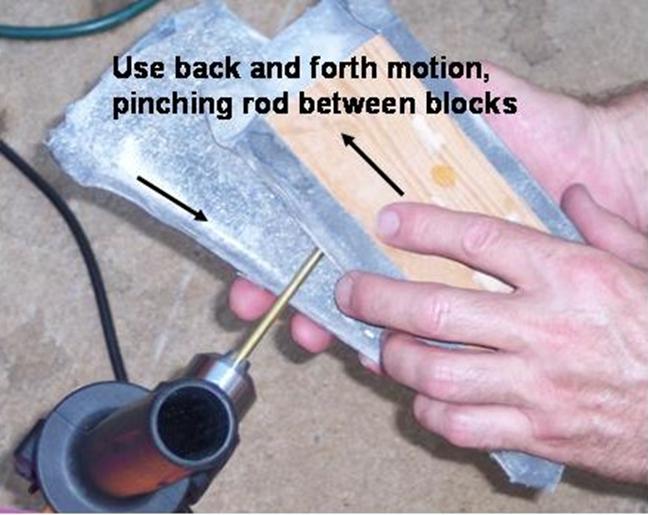
Ramming:
Place the spindle in the base. Place the tube in the sleeve and clamp it
with the bottom of tube flush with one end of the sleeve. Insert your rammer ( the one with the drilled
hole) until it touches the base. Mark
the rammer so you can determine how much powder you have added. Remove the rammer. Add approximately 2 teaspoons of powder,
insert the rammer, and pack the powder with a hammer. If you add too much powder with each
increment, it will not compress into a solid very well and the motor may
explode. After the powder has been
rammed, the height or thickness of each increment should be about 1/2 of the
motor’s inside diameter. So, for a ¾” ID
motor, about 3/8” of powder for each increment, after it is has been rammed, is
a good rule of thumb. It is common to
need 20 or more increments for one motor.
So, be patient and don’t put in too much powder. For ramming the best hammer is a plastic or
rawhide mallet. A dead-blow hammer will
work, but you can’t “feel” the powder compress as well and you have to do
additional work to make sure it is rammed correctly. Heavy hammers are also better because you can
get good results with a much gentler blow, which is better on you and the
tooling. My favorite type hammer is the
http://www1.mscdirect.com/CGI/NNPDFF?PMPAGE=2274&PARTPG=N2DRVSH&PMT4NO=12660620&PMITEM=32833246&PMCTLG=00&PMT4TP=*LTIP The “yellow plastic extra hard” is the face
type that I normally use. The rawhide
ones also work well. The #3 size is good
for 3/4” ID rockets. The #4 size is
better for 1” and I use the #5 for 1.5” rockets. Normally on the third or forth hammer blow,
the powder will compress no more. It is
good to give it a few more hits, just to be sure. If you are using a dead-blow, I would say 10
blows per increment. 6-8 if you have a
good hammer and it is sized correctly for the motor you are building.
Keep an eye on how much of the
spindle is showing after each increment.
As you near the point where the spindle is covered, adjust the amount of
powder so that one of the increments will finish with the spindle just barely
showing. You are now ready to switch to
the rammer with no hole in it. Before
you put down your drilled out rammer, clean the hole of any powder that may
have been packed into the hole. This
could save you headaches on your next rocket, because you don’t want to ram
with powder trapped inside your rammer.
From the top of the spindle I normally put in one or two more increments
and ram them with the solid rammer. When
the motor burns, it burns from the core hole out and up. By the time the fire hits the wall of the
tube the motor is done and it will have burned upward about 1/2 of the tube
diameter, above the spindle. Now you can
ram some delay powder. Fuel works fine
for delay, or you may want something slower.
I like to add a little spherical Titanium to the delay for a bright
spark trail. If you want to show some
Titanium on take off, just add it to the fuel right above the top of the
spindle. It will be burned on take off
and it is better on your tooling to avoid the metal in the fuel around the
spindle. This is a trick advocated by
Steve LaDuke and it works very well. It also avoids the need of having several
different mixtures of fuel, just have some doctored up for delay. Chrysanthemum #6 charcoal star mixture also
works well for a delay mix. You want at
least two tube diameters of fuel and delay above the spindle to keep the motor
from blowing out the top. If you have
problems with this, or if you want less delay (for heavy payloads) use kitty
litter (Wal-Mart Special Kitty) to help plug the tube. You will have to drill through the clay plug
to pass fire to the heading, if you go this route. One thing good about nozzle-less motors is
that they build less internal pressure and are much less likely to blow out the
top.