Bullet Design
I shoot guns. To make a spud gun that you could not hit a target with did not turn me on very much. After a few shots with my first spud gun I decided I wanted something that would fly straight and could be used over and over. I had some experience with model rocket design when I was a kid. So I started experimenting with PVC pipe and an end cap. For the bullet to fly straight I had to have the same kind of stability as a rocket or arrow. This meant weight in the nose and something on the tail that, when turned, would create an out of balance high drag condition. One of my first bullets was a straight piece of pipe with a cap and a lot of weight. I tried putting a ring on the tail end to make it fit the barrel a little better. This one worked okay but the ring was hard to make and was damaged on the second or third shot.
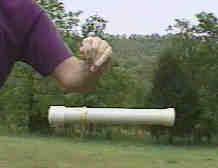
If you want to design your own, here is the most important thing to know. You need to test fly your design to be sure it will fly. This is the procedure I learned as boy. Tie a string around your bullet, or rocket. Position the string to where the bullet is balanced and tape the string to where it stays on the balance point. Move to an area where you have plenty of room. Hold the bullet in one hand, at arm's length, with the string in the other hand. Make ready to spin around 'flying' the bullet on the string. Try to start with the bullet nose forward and start spinning around. Let out more string until the bullet is 6-8 feet away from you. At this distance the air speed over the bullet should be enough to make it fly straight if it is a stable design. If it turns sideways or in any way does not fly straight then you must make the nose heavier or add fin area. The tail must fit in the bore of the gun so you are limited a lot on what you do to the tail. If you make the tail longer, that may help, but by making the tail heavier you change the balance. A longer and heavier tail may not help at all. Weight in the nose is my first choice.
This is the method I used and here are the instructions for my 1.25 inch bullet.
Cut 6.75 inch, thin wall 0.75 PVC pipe, square ends
1 PVC end cap 0.75 inch, the longest, heaviest one you can find
1 Fender washer 1 inch OD with a 0.125 inch hole. Solder or glue the hole closed. If you could find a 1 inch solid disk that would be perfect.
3/4 teaspoon of lead bird shot. I used a 1/4 teaspoon measure 3 times. If you don't have lead shot look for something heavy. Sand might work but if you fill the cap too full you can't glue the pipe in.
I made a version for a 2 inch gun. It is about the same.
Cut 13.5 inch, thin wall 1.25 PVC pipe, square ends
1 PVC end cap 1.25 inch, the longest, heaviest one you can find
1 Fender washer 1.25 inch OD. Close the hole in the washer. I used a 1/4-20 bolt. If you could find a 1.25 inch solid disk that would be perfect.
1.5 teaspoon of lead bird shot. I used a 1/4 teaspoon measure 6 times. If you don't have lead shot look for something heavy, maybe some smaller washers stacked on the 1/4-20 bolt..
I stretched the 2 inch model over a 6 oz Louisiana Hot Sauce bottle. It was a perfect fit.
Now for the hard part. You need to flare the tail to fit the barrel. Do this before you glue the cap on. If you are going to mess up it will be here. No use in wasting the cap too. A flared tail provides a good seal and helps stabilize the bullet. I first tried using a propane torch. This was slow and sometimes got the PVC too hot. What I found to work great was a Fry Baby. Here is a photo of the 'bullet factory'. Put about 2 inches of cooking oil in a small deep fryer. Dip the end of the pipe in the hot oil for about 10 seconds. This will make the PVC soft enough to stretch over a form. I found a small light bulb that works fine. Push the pipe over the form and try to keep it straight. Get a helper to cool it with a wet rag, while you hold it on the form. If you don't like the way it looks dip it back in the oil and start over. It will go right back to a normal size. If you get it too hot it can wrinkle above the form. You need to practice a few times and they come out pretty good. Most of mine are somewhat bigger than the barrel and must be trimmed off. I have a belt grinder that works very good for this. I grind off a little at a time until I get the fit I want. It may be possible to trim them with a heavy pair of sheet metal shears. I would want to sand the end off smooth, I think. Maybe a belt sander turned on edge would work for a grinder. I have not tried that.
Assembly:
Put the shot in the cap. Put the sealing disk (washer) in the cap on top of the shot. Glue the tail-piece into the cap.
Test fire at reduced pressure. I would suggest about 30 PSI. The goal is to get something to go straight.
The best thing to do is to get some kids to help you. Most are easy to teach, they enjoy it, and you get free labor. I made a jig and my son cuts up the pipe with a saw for me.
Testing:
I don't have a 2 inch gun but wanted to make a 2 inch bullet. I also needed some way to get rid of Easter eggs so I made an adapter to put a, 30 inch long, 2 inch barrel extension on my old 1.25 inch gun. 30 inches is not much and the old gun has a 1 inch ball valve for firing. Needless to say not worth much to drive a 2 inch projectile. I wanted to see it fly more than anything else. I fired it with 60 psi and it went 120 yards, from about a 45 deg. angle. Here is a page, with several pictures, that shows the bullet as it exits the barrel. It is about 60k total, not too bad.